A plain-language explainer for ruvnet/agent-harness-generator by Reuven Cohen (@ruvnet). Not affiliated — an independent walkthrough of the open-source project.

Updated 2026-06-19 · source @ db65fab · v0.1.3 (latest release tag; the tool self-describes as v0.1.x beta)

MetaHarness

ruvnet · agent-harness-generator

The harness is
the product.

MetaHarness is a free tool that turns any GitHub repo — or a blank page — into your own AI assistant: its own name, its own npx your-name command, the skills it needs, a memory of your project, and a built-in safety net. It runs on your machine. It never runs your code. The AI model underneath stays the same — what you build and own is the wrapper around it.

An independent explainer for Reuven Cohen’s (@ruvnet) agent-harness-generator — built to help you actually adopt and implement his technology.

Get the drop-in →
01

Why it was built

Arc 1 — what pushed someone to make this?
The one-way door: forking ruflo versus generating with MetaHarness Forking the whole ruflo bundle freezes you and cuts you off from future kernel updates. MetaHarness generates only the pieces you want, branded by you, while still pulling future engine updates. The "one-way door" Forking the whole bundle vs. generating just the pieces you want BEFORE — fork ruflo The whole ruflo bundle (one frozen copy) Kernel primitives MCP, hooks, memory, routing Bundled content 60+ agents · 30+ skills · 33 plugins Kernel and content are fused together — you must take all of it You fork the ENTIRE thing just to rebrand it Your frozen fork A snapshot — never moves again on its own fork Future engine updates never reach your fork cut off AFTER — generate with MetaHarness ruflo kernel (lives upstream, keeps improving) MCP · hooks · memory · routing · witness — pinned version MetaHarness generator picks ONLY the pieces you choose Your branded harness npx your-name · your agents · your skills only the parts you wanted — owned by you generate Future engine updates still flow in — re-pin to a newer kernel stays connected to the kernel Fork = take everything, then it freezes. Generate = take what you need, keep getting updates.
The one-way door, drawn out: forking the whole ruflo bundle freezes you and cuts off engine updates (left); MetaHarness generates only the pieces you want, branded by you, and stays connected to the kernel for future updates (right).
A dull grey metal plate labelled Your GitHub Repo on the left, a glowing mint press labelled Mint It in the centre, and a warm amber coin labelled Your Custom Agent on the right, connected by an arrow.
The core idea in one picture: a plain repo goes in, gets stamped, and comes out as a finished, branded agent you own.

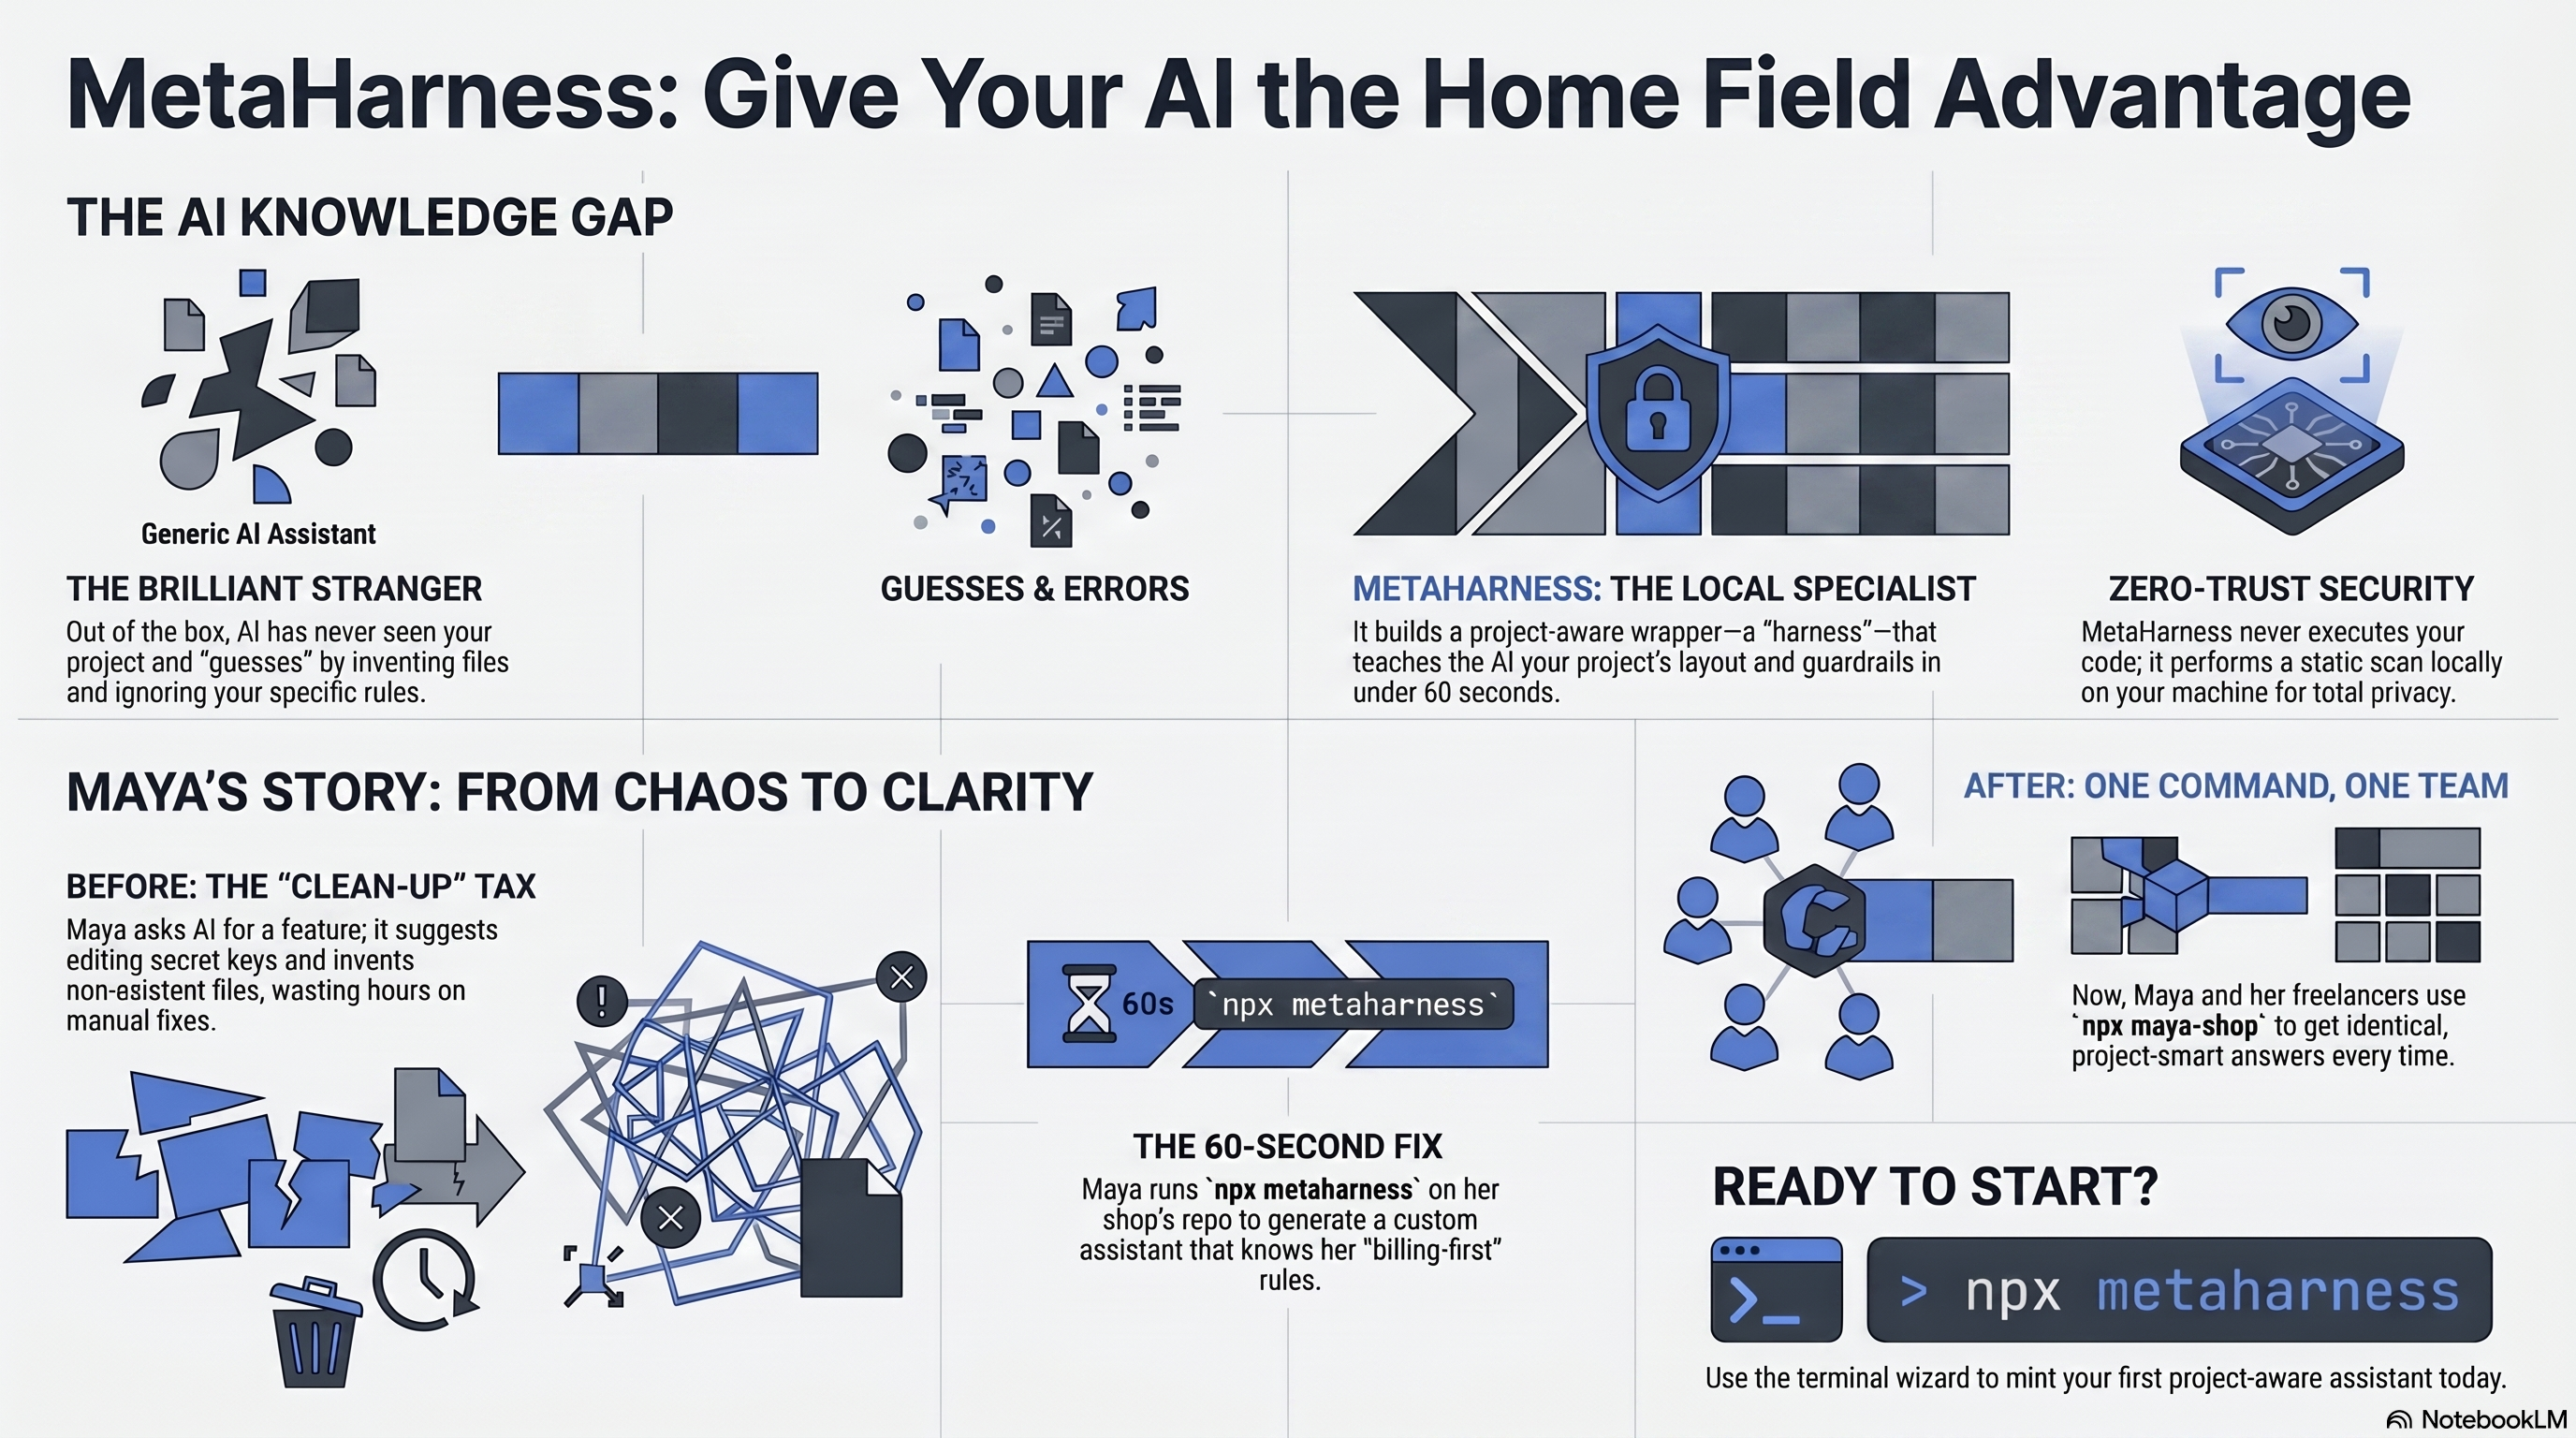
First, the short version of what it is, so the rest makes sense. A harness is the wrapper around an AI model — not the model itself. Underneath you are still talking to Claude, GPT, or whatever model you use. The harness is the bit that gives your assistant a name, knows your project, carries a set of skills, and keeps a safety net around what it is allowed to do. MetaHarness is a factory that builds those wrappers. As the project puts it: “It is not another agent framework. It is a factory for agent frameworks. The model is replaceable. The harness is the product.”

So why build a factory instead of just one more assistant? Because of a trap the makers hit themselves. Their earlier product, ruflo, came as one big bundle — a small core engine welded to 60+ pre-made agents, 30+ skills, and 33 plugins, all fused together. People loved the engine but wanted their own brand, their own agents, and their own listing. The only way to get that was to copy (“fork”) the whole bundle — and the moment you did, you were cut off from every future update to the engine. That is a one-way door: rebrand once, and you are frozen in time.

MetaHarness was built to take the hinges off that door. It separates the reusable engine from the opinionated content, so you can take just the engine and generate just the pieces you actually want — owned and branded by you, and still able to pull future engine updates.

02

What problem it solves

Arc 2 — what pain does this take away?
The problem MetaHarness solves: lock-in, host fragmentation, and rebuilt plumbing A generic AI agent guesses at your repo. Three concrete problems follow: lock-in when you fork a bundle to rebrand it, host fragmentation across different agent runtimes, and reinventing about 80 percent of the same infrastructure on every new project. The problem Why a generic agent is not enough — and why three things keep going wrong Generic AI agent knows nothing about YOUR codebase "...is this a Python repo?" Your repo its own layout, build, tools, conventions needs an agent that fits guesses ? ? ? no project knowledge, no fit Three problems this creates 1 · Lock-in You fork a bundled product just to put your brand on it Now you are off the upstream — no future updates Rebranding shouldn't cost you every upstream improvement (the same one-way door) 2 · Host fragmentation Agents now run in many places — each with its own config rules Claude Code Codex Hermes pi.dev One agent, many hosts Each host wants different config files — a rewrite should target any host, no rewrite 3 · Rebuilt plumbing Every new agent project rebuilds the same boring infrastructure MCP server setup memory namespace governance policy release signing ~80% built by hand, every time the same plumbing, over and over Lock-in, host fragmentation, and rebuilt plumbing are exactly what MetaHarness is built to remove.
The three pains, side by side: a generic agent guesses at your repo, then lock-in, host fragmentation, and rebuilding ~80% of the same plumbing follow.

There are three everyday headaches it removes:

  1. Lock-in. As above — copying a bundled product just to rebrand it means you give up every future update to the part you actually relied on. You get stuck.
  2. Too many places to run an assistant. Claude Code used to be the obvious home for AI agents. Now there are several — Codex, Hermes, pi.dev and more — and each one wants its config files set up its way. (Config = the small settings files that tell a tool how to behave.) Setting the same assistant up by hand for each place is tedious and easy to get wrong. MetaHarness writes the right files for whichever places you pick.
  3. Rebuilding the same plumbing every time. Roughly 80% of any new agent project is the same unglamorous wiring done over again: a local tool server, a place to keep memory, the rules for what is allowed, and a way to sign your release so people can trust it. MetaHarness generates all of that for you, correctly, in one go.

In plain terms: instead of spending your first week rebuilding scaffolding, you answer a few questions and get a clean, safe starting point that is already yours.

03

Why now

Arc 3 — why does this make sense at this moment?
Why now: hosts have multiplied and the plugin marketplace woke up Two forces make a harness factory worth building now. First, the hosts multiplied — Claude Code, Codex, pi.dev, Hermes, OpenClaw and RVM all gained agent conventions. Second, the plugin marketplace woke up — a scaffolded harness both consumes plugins from the ruflo IPFS registry and can publish its own back. Why now Two shifts made a "factory for harnesses" worth building 1 · The hosts multiplied Claude Code used to be the only place. Now there are many. Then one host Now six+ hosts Claude Code stable Codex CLI MCP support pi.dev dev platform Hermes Nous Research OpenClaw newer RVM newer One generated harness targets any of them — no rewrite 2 · The marketplace woke up Plugins are now traded — a harness both takes and gives. ruflo IPFS plugin registry the shared marketplace of agent plugins Your scaffolded harness a marketplace participant consumes pulls plugins in publishes pushes its own back Without a generator, every new participant rebuilds 80% by hand More hosts to target + a live plugin economy = the moment a harness factory pays off.
Why now: the hosts multiplied (Claude Code, Codex, pi.dev, Hermes, OpenClaw, RVM) and the plugin marketplace woke up — a generated harness both consumes plugins from the IPFS registry and can publish its own back.
A friendly foundry assembly line: a box labelled Your Repo enters a glowing machine and a finished toolkit rolls out holding four labelled parts — CLI, Memory, Skills, and Guardrails.
Your repo goes in one end; a tidy, branded toolkit — a command (CLI), a memory, a set of skills, and guardrails — comes out the other.

A factory only pays off once there is enough variety for it to produce. Two things just crossed that line.

The homes for AI agents multiplied. A year or two ago you mostly ran assistants in one place. Now Codex, Hermes, pi.dev and others each have their own way of running agents. A factory that can target any of them — without you rewriting anything — is suddenly worth having.

The plugin marketplace woke up. A “plugin” is just an add-on capability you can drop into your assistant. There is now a shared, open registry of these (hosted on IPFS, a decentralised file network), so a harness you build can both pull in ready-made plugins and, if you want, publish its own. Building becomes assembling from parts rather than carving everything from scratch — which is exactly when an assembly line earns its keep.

04

How it solves it

Arc 4 — how does it actually do the job?
The composer pipeline A GitHub repo, or a blank slate, enters the composer and flows through nine stages in order — Identity, Hosts, Primitives, Agents, Skills, Plugins, Features, Branding, Confirm — emerging as a branded, npm-publishable agent harness package. Each stage shows in plain words what happens there. HOW IT ACTUALLY WORKS UNDER THE COVERS The composer pipeline You answer nine questions, in order. The composer assembles a complete package from your answers. A GitHub repo …or a blank slate. It never runs your code — it only reads. Same nine questions, two ways A friendly picker (the “wizard”), or the same answers as command-line flags. 1 Identity The name, the package scope, a description, a licence, and who the author is. One screen. 2 Hosts Tick where it should run — Claude Code, Codex, pi.dev, Hermes, and more. Pick at least one. 3 Primitives Engine blocks on or off: tool server (always on), automations, memory, routing, marketplace, provenance. All on by default. 4 Agents Choose helpers from a curated catalogue. It suggests a coder, a reviewer, and a tester to start. 5 Skills Reusable abilities you bolt on — defaults wire up hooks, memory search, and swarm orchestration. 6 Plugins Optional add-ons from the shared registry, with live download counts and ratings. None by default. 7 Features Opt-in extras that change the wiring: teamwork between agents, claims-based access, self-improvement. 8 Branding “Powered-by” mode or fully independent, plus your own brand wording. 9 Confirm A summary: every file it will create, the exact engine version it pins to, and a size estimate — before anything is written. EMERGES AS A branded, npm-publishable harness Your own npx your-name command — a self-contained package you own and can publish. (See section 05.) The composer’s state is one typed answer-object — the picker and the flags build the same thing, so both paths produce the same harness.
The composer pipeline: a repo or blank slate enters and flows top-to-bottom through the nine ADR-003 stages — Identity, Hosts, Primitives, Agents, Skills, Plugins, Features, Branding, Confirm — emerging as a branded, npm-publishable harness. It never runs your code.

It walks you through a short series of choices — call it the composer — and then assembles a complete, self-contained package from your answers. You can answer the questions in a friendly picker (a “wizard”) or, if you prefer, pass the same answers as command-line options. Either way you end up at the same place. The steps, in order, are:

  1. Identity — the name, the package scope, a description, a licence, and who the author is.
  2. Hosts — tick which places you want it to run (Claude Code, Codex, and so on). Pick at least one.
  3. Primitives — switch the engine’s building blocks on or off: the tool server (always on), automations, memory, smart routing, the marketplace hook, and signed provenance. All on by default.
  4. Agents — choose helpers from a curated list (it suggests a coder, a reviewer, and a tester to start).
  5. Skills — reusable abilities you can bolt on.
  6. Plugins — optional add-ons from the shared registry (none by default).
  7. Features — opt-in extras like teamwork between agents or self-improvement.
  8. Branding — “powered-by” mode or fully independent, plus your brand wording.
  9. Confirm — a clear summary: every file it will create, the exact engine version it pins to, and a size estimate, before anything is written.

Two things make this safe and predictable. It never runs your code — when it looks at a repo it only reads the file list and a few text files to make suggestions; it does not execute anything. And the generated tool server starts locked down (“default-deny”): no internet access, no shell, no writing to files, until you explicitly allow each one. Nothing is on that you did not turn on.

A note so the numbers add up: the teaching walkthrough on this page uses seven questions (the 7 stages of understanding, sections 01–07). The tool’s own composer has the nine build steps listed just above. They are different lists for different jobs — don’t worry if the counts differ.

05

What “solved” looks like

Arc 5 — how do you know it worked?
Anatomy of a generated harness What is literally inside the output package: a repo-aware command-line tool, a local tool (MCP) server, a project-scoped memory space, skills generated from your file layout, a default-deny governance policy, and witness-signed releases — all wrapping a replaceable AI model and pointed at your repository. WHAT “SOLVED” LOOKS LIKE Anatomy of a generated harness One self-contained package — say you called it my-bot. Here is what is literally inside it. THE HARNESS — THE WRAPPER YOU OWN Everything below is yours, branded as you, and ships in the package. A repo-aware command-line tool Your own npx my-bot command, branded as yours — not as someone else’s tool. It knows your project, because it was built for it. A local tool server Its own MCP server registration, running on your machine. This is how the agents reach tools — nothing hosted, nothing remote. Project-scoped memory Its own private memory space, kept separate from everything else on your machine. What it learns about your project stays with it. Skills from your file layout It reads your repo’s file list, manifest and README to suggest the right agents and skills — without ever executing your code. A default-deny safety policy The tool server starts locked down: no internet, no shell, no writing files — until you allow each one. Nothing on you didn’t turn on. Witness-signed releases A signed receipt of exactly what is inside (an Ed25519 witness manifest), so anyone who installs it can confirm nothing was swapped. + the agents, skills, plugins, and per-host config files you chose Copied from the catalogue into the package — your selection, wired up and ready to run. REPLACEABLE SLOT The AI model — Claude, GPT, or whatever your host brings The harness wraps the model; it is not the model. Swap the model and everything above still stands. POINTED AT YOUR repo The whole harness is tuned to one codebase — yours — not a generic chatbot. It reads, but never runs, your code. aimed at → SHIP IT npm publish Your users run npx my-bot init They never see the factory underneath — only your brand. The model is replaceable. The harness is the product. Nothing here is invented — every piece is what the generator writes into the package, locked down and signed by default. v0.1.x beta — published and usable; the README badge shows 568 tests passing.
Anatomy of a generated harness: the wrapper you own — repo-aware CLI, local MCP tool server, project-scoped memory, skills inferred from your file layout, default-deny governance, Ed25519 witness-signed releases — wrapping a replaceable model and pointed at your repo. The model is replaceable; the harness is the product.
A warm circular loop of molten metal with three steps around it — try a small tweak, test it safely, keep what helps — and a glowing checkmark in the centre.
The self-improvement loop: try a small tweak, test it safely, keep only what helps. It can keep going on its own.

When it has done its job, you have a single, self-contained package — say you called it my-bot — that includes:

  • Its own npx my-bot command, branded as yours, not as someone else’s tool.
  • Its own local tool server, locked down by default.
  • Its own private memory space, kept separate from everything else.
  • The agents, skills, plugins, and per-place config files you chose.
  • A signed receipt of exactly what is inside it (a cryptographic signature called an Ed25519 witness manifest), so anyone who installs it can confirm they got precisely what you shipped — nothing swapped or added.

You can publish it (npm publish) and your users run npx my-bot init. They never see the factory underneath — only your brand.

And it does not have to stand still. A finished harness can be set to quietly improve its own settings over time: it tries a small tweak, tests it safely in a sandbox, and keeps the change only if it measurably helped. The AI model never changes — only the wrapper gets a little better. (More on this in the use cases below.)

Honest maturity note: this is v0.1.x beta — published and usable, but still settling. The README badge shows 568 tests passing; you may see slightly different totals in other docs as they catch up, so treat 568 as “the headline figure,” not gospel.

06

How to implement it

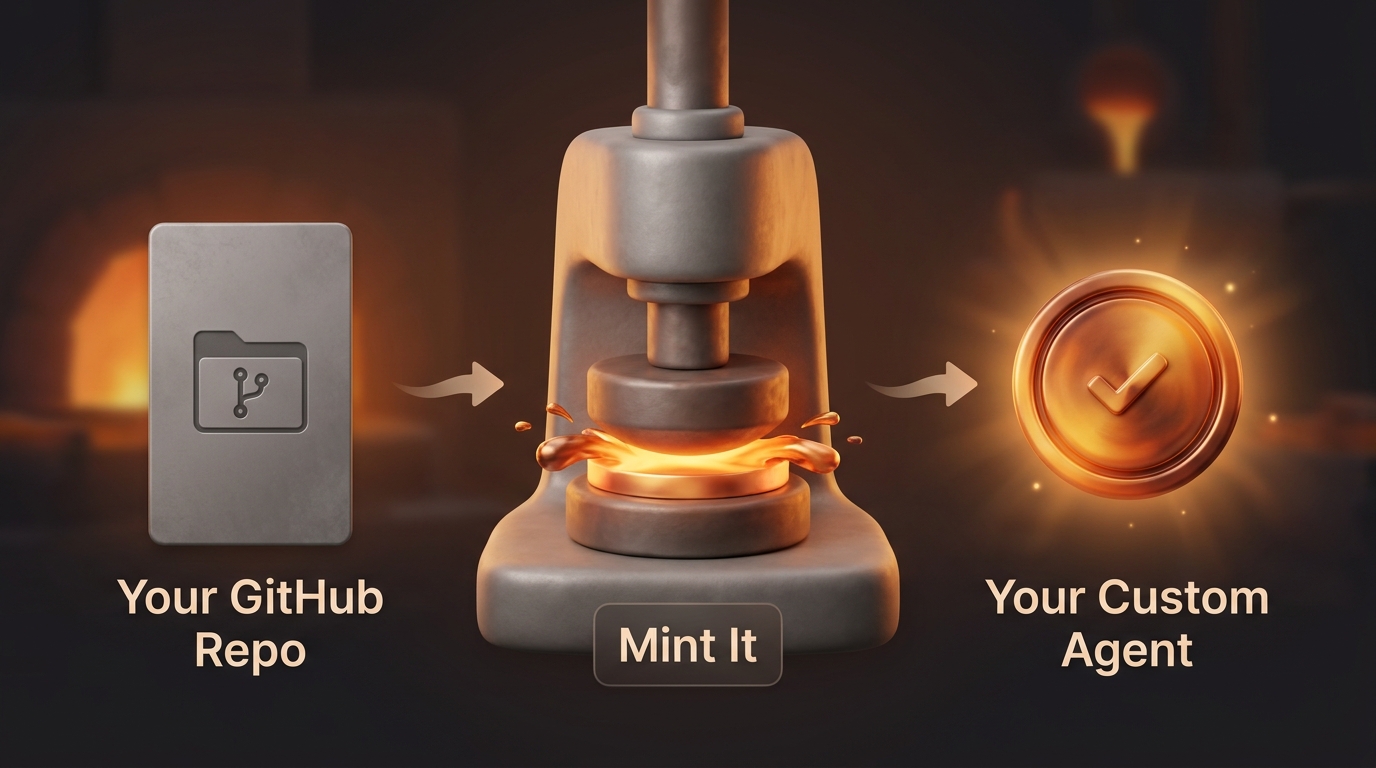
Arc 6 — what does the path from idea to package look like?
Two ways in, one result Two implementation paths — the browser Studio and the terminal (npx metaharness) — both produce the same branded harness package that is yours to keep. Two ways in — same result Pick the path that fits how you work. Both hand you a .zip (or folder) that is yours to keep. Browser Studio nothing to install Open the Studio ruvnet.github.io Pick a tab, make choices repo, scratch, skill, verify Download .zip in your browser Terminal if you live in the command line Run the command npx metaharness Flags or wizard --template --host or --wizard asks you Scaffolded folder written to disk Same branded package your own npx my-bot, yours to keep Then, on your own machine — identical from here: unzip my-bot.zip   →   cd my-bot   →   npm install   →   edit, then npm publish --provenance
Two ways in, one result: the in-browser Studio (Download .zip) and the terminal (npx metaharness) both produce the same harness folder that is yours to keep.

There are two ways in, and they give the same result — a .zip (or scaffolded folder) that is yours to keep.

1. In your browser, with nothing to install. Open the Studio at ruvnet.github.io/agent-harness-generator, pick a tab (turn a repo into a harness, create one from scratch, add a skill or agent, or verify a harness), make your choices, and click Download .zip. Then on your own machine:

unzip my-bot.zip
cd my-bot
npm install

The Studio runs entirely in your browser. For analysis it only reads a repo’s public file list through GitHub’s API — it never reads your file contents on a server, and there is no account, no sign-in, and no tracking.

2. In your terminal, if you live there. The same behaviour, from the command line:

npx metaharness my-bot --template vertical:coding --host claude-code
# or be asked the questions instead:
npx metaharness --wizard

After scaffolding, the files are yours: open them, delete what you don’t need, adjust the wording and the routing, and when you’re happy, ship it with npm publish --provenance (the --provenance part attaches that signed receipt so installers can trust it).

One naming note so nothing trips you up: the published command is npx metaharness. In some older docs you may see npx create-agent-harness — that is the same tool under its internal package name, not a second product. Lead with metaharness.

07

How to start

Arc 7 — what is the single fastest first step?
The fastest start: one command, four questions, your own tool A three-step flow. Run npx metaharness --wizard, answer a few plain questions (name, template, host, description), and you get your own npx your-name command. The wizard also prints the exact command so you can skip the questions next time. The fastest start One command, four questions, a working package — in your own name. 1 Run the wizard npx metaharness --wizard Nothing to set up. npx fetches it for you. 2 Answer 4 questions a name a template where it will run (host) a one-line description 3 You get your tool npx <your-name> Your brand, your skills, your own command. Bonus: skip the questions next time The wizard prints the exact npx metaharness … command it just ran — paste it to repeat in one line.
The fastest start: one command (npx metaharness --wizard), four questions (name, template, host, one-line description), and a working package — with the exact non-interactive command printed so you can skip the questions next time.

Prefer the terminal? If you’re not sure what to pick, run the wizard. It asks just four things — a name, a template, where it will run, and a one-line description — and then prints the exact npx metaharness … command it would have run, so you can skip the questions next time:

npx metaharness --wizard

Already know what you want? Jump straight in:

npx metaharness my-bot --template vertical:coding --host claude-code
cd my-bot && npm install && npx . --help

Want to see what’s on the menu first? npx metaharness --list shows every template. And once your harness exists, run harness doctor — a quick health check that confirms the scaffold is set up correctly before you go further.

That’s the whole on-ramp: browser Studio or one terminal command, four questions, a working package. The use cases below show where to take it next.

08

Use-case gallery

Six real situations — the situation → the exact command → what it does → what you get.
Flow: your repo enters analyze-repo (reads file list only, never runs code), out comes a fitted set of agents, skills, and tools as a ready harness or .zip.
Scenario 1 — repo in, an assistant that actually understands it out (it reads, it never runs).
Flow: a repo enters score/genome (read-only), out comes a one-screen report card with fit, build-likelihood, tool safety, cost-per-run, and a ready / needs-work / blocked verdict.
Scenario 2 — a go / no-go report card before you build, backed by evidence.
Flow: pick a vertical template (support, trading, legal), out comes a domain team of purpose-built agents with matching skills and per-host config, locked down by default.
Scenario 3 — a ready-made domain team from a single template, locked down by default.
Flow: a colleague's .zip enters mcp-scan / threat-model / verify (nothing executed), out comes a clean / medium / high verdict, a shareable report, and a confirmed signed receipt.
Scenario 4 — vet a colleague's harness statically: clean / medium / high, nothing executed.
Flow: each request enters the router, which sends it to the cheapest model predicted to clear your quality bar, so you get the same answer quality for a far smaller bill.
Scenario 5 — route each task to the cheapest model that still clears your quality bar.
A simple bar chart on a light cream background: a tall BEFORE bar marked with three dollar signs next to a much shorter AFTER bar marked with a cent sign, each topped by an identical green checkmark to show the quality is the same.
Same result, far smaller bill: route each task to the cheapest model that is still good enough.
Flow (Darwin Mode): the harness changes one of its own settings, tests it safely in a sandbox, and keeps it only if it measurably helped. The model stays frozen; only the wrapper evolves.
Scenario 6 — Darwin Mode: try a tweak, test it safely, keep only what measurably helps.

Every command below is taken straight from the project’s own docs — nothing here is made up. Pick the one that sounds like you.

Scenario 1

“I have a repo and want an assistant that actually understands it”

The situation
You maintain a codebase and want a coding helper tuned to that project — not a generic chatbot that knows nothing about your file layout.
The exact command
harness analyze-repo .                    # just look, suggest nothing risky
harness analyze-repo . --scaffold my-bot  # build the suggested harness
Or, in the browser: the Studio’s Repo → Harness tab — paste the GitHub URL, review the suggestions, click Download .zip.
What it does
Reads your file list, your package.json, your README, and your mix of languages, then recommends a fitting set of agents, skills, and tools. It never runs your code; any build or test commands it spots are written down but switched off (marked execution: disabled).
What you get
A ready-to-use harness (or a .zip) with a sensible starting agent set for your repo — npm install and you’re running.
Scenario 2

“Is this repo even worth building an assistant for — and what will it cost?”

The situation
Before you commit any time, you want a quick read on whether a repo is a good candidate, and roughly what each run will cost.
The exact command
npx metaharness score <repo>   # a one-screen report card
harness genome <repo>          # a fuller pre-build readiness report
What it does
Reads the repo (again, never runs it) and prints a single screen: how well a harness fits, how likely it is to build cleanly, how safe the tools look, and the rough cost per run. genome adds a plain verdict — ready, needs-work, or blocked.
What you get
A clear go / no-go decision, backed by evidence, before you build anything — plus a suggested plan.
Scenario 3

“Give me a ready-made team for my industry — support, trading, legal…”

The situation
You want a pre-built set of agents for a known area and you’d rather not memorise any options.
The exact command
npx metaharness --list                       # browse every template
npx metaharness my-bot --template vertical:support
npx @metaharness/support my-bot              # same thing, zero options to remember
What it does
Builds a harness pre-loaded with that area’s purpose-built agents (with their instructions written in), plus the matching skills, commands, and per-place settings — all locked down by default. The shortcut wrapper produces a byte-for-byte identical result to the longer command.
What you get
A working domain team — for example a customer-support pod, a quant-trading setup that is paper-only until you say otherwise, or a contract reviewer that only ever drafts, never sends.
Scenario 4

“A colleague sent me a harness — is it safe to run?”

The situation
Someone hands you a generated .zip and you want to vet it before installing anything.
The exact command
The Studio’s Verify tab (checks without unzipping or running a thing), or from the terminal:
harness mcp-scan <path>      # like "npm audit" but for agent tools
harness threat-model <path>  # a shareable review write-up
harness verify               # confirm the signed receipt is intact
What it does
Statically inspects the harness for risky permissions (internet, shell, file-writing), missing timeouts, wildcard rules, exposed secrets, and unpinned dependencies. mcp-scan stops with an error on any high-severity finding. verify confirms nobody has tampered with the signed receipt. Nothing is executed.
What you get
A clean / medium / high verdict and a shareable report — in plain terms, “no riskier than any other npm package you would install” if it passes.
Scenario 5

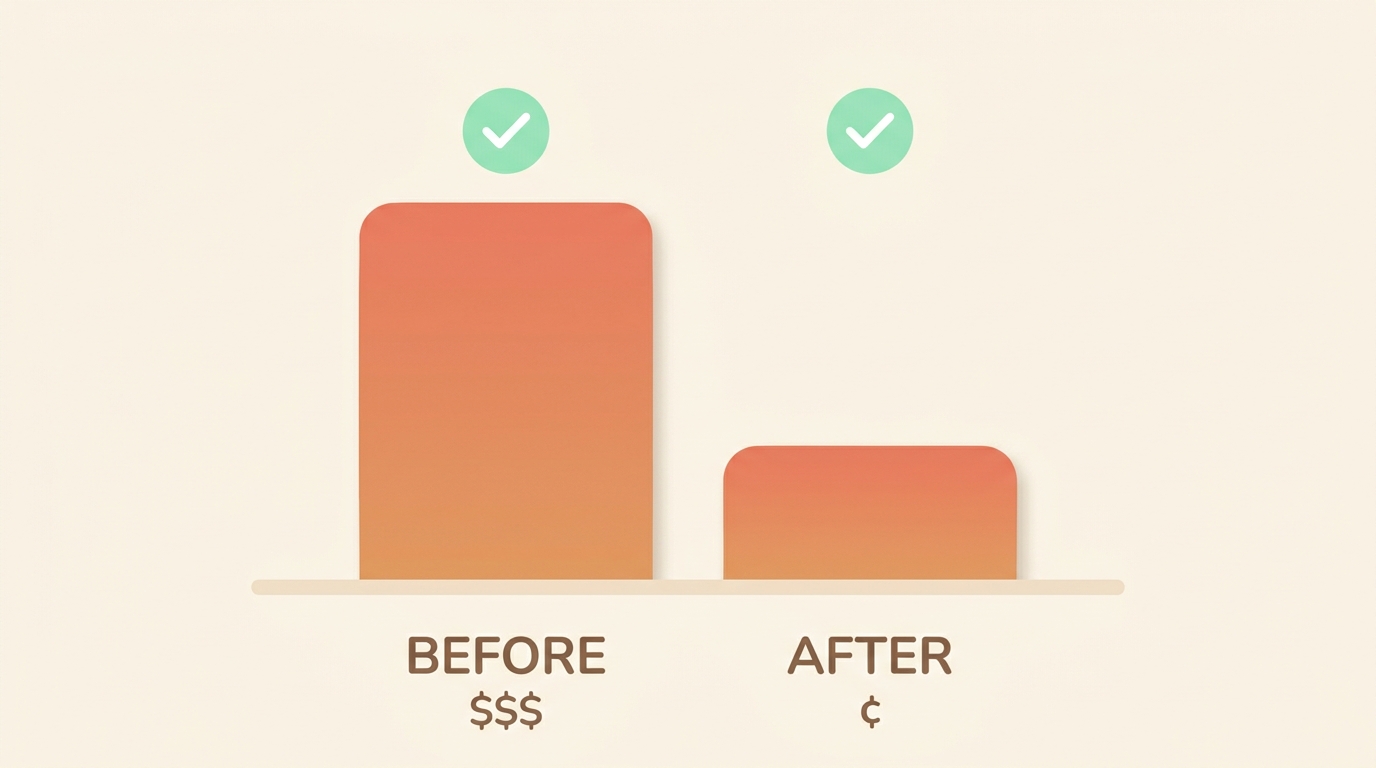
“Cut my model bill without losing quality”

The situation
You’re paying top-tier prices for work a cheaper model could handle just as well.
The exact command
npm i @metaharness/router
# then in your code:
# route(query) -> the cheapest model predicted to clear your quality bar
What it does
The router sends each request to the cheapest model it expects to still meet the standard you set — a standard it learns from your own results. It works out of the box, and you can train it on your own data for an even better fit.
What you get
The same quality of answer for less money. The project’s own benchmark reports a small, cheap model delivering top-tier-quality research at roughly one-tenth the cost. Honest caveat: the underlying timing signal is described as “a diagnostic signal, not a proven early warning — test it on your own workload before relying on it.”
Scenario 6

“Let the harness quietly improve itself (Darwin Mode)”

The situation
You want your harness to tune its own settings over time — without anyone touching the AI model.
The exact command
npm run evolve     # built into every harness; add --no-darwin to switch it off
What it does
It changes one of its own settings, tests that change safely in a sandbox, and keeps it only if it measurably made things better. The model stays frozen; only the wrapper evolves. Safe by default — no internet, no API key, just careful tuning behind a safety gate.
What you get
A harness that gets a little better on its own, measured against a real goal (the project validates this on actual bug-fixing tasks). Treat it as experimental — you can always opt out with --no-darwin. (Pictured up in section 05.)
09

Drop-in

The AI half — one download, drop it into your agent.
The drop-in: one zip, two halves, three steps to wire it in One download splits into two halves. The For-you half is a written primer plus a studio folder containing a NotebookLM audio overview (play this first) and a deep-dive report. The For-your-AI half is a searchable knowledge pack (an .rvf file plus a small MCP server). Wiring the AI half into Claude Code is three steps: unzip the kb folder, add a .mcp.json pointing at it, and paste a verification gate into CLAUDE.md so your AI answers from the real source instead of guessing. The drop-in — one zip, two halves One download. Half is for you to read; half is for your AI to search. one .zip metaharness-dropin For you A primer — plus a studio/ folder to listen & read. 🎧 audio overview 📄 report For your AI A searchable knowledge pack. kb / .rvf MCP server wire this half into Claude Code Three steps to wire it in 1 Unzip the pack unzip … → cd kb/ → npm i Put the kb/ folder by your project. 2 Add .mcp.json "metaharness-kb": … Registers the pack as a tool. 3 Paste the gate into CLAUDE.md Forces a check before answering. Result: your AI answers from the real source — grounded, with citations — instead of guessing.
The drop-in, step by step: one zip splits into for-humans/ (the primer you read, plus a studio/ folder with a 🎧 audio overview and 📄 report) and for-ai/ (the knowledge pack your assistant searches), wired into Claude Code in three small steps — unzip, register a .mcp.json tool, add a CLAUDE.md gate.
One zip file at the top splits into two equal panels: a left panel labelled For you showing a person reading and watching, and a right panel labelled For your AI showing a warm, searchable glowing brain with a magnifying glass.
One zip, two halves: for-humans/ (the primer you read, plus a studio/ folder with a 🎧 audio overview and 📄 report) and for-ai/ (the knowledge pack your assistant searches).

Everything on this page also comes as one download with two halves. One half is for you — a short written primer, plus a studio/ folder with a NotebookLM audio overview and a deep-dive report. The other half is for your AI — a small, searchable knowledge pack your assistant can read so it can answer questions about MetaHarness accurately, with sources, instead of guessing.

Inside for-humans/studio/ — start here

  • 🎧 metaharness-audio.m4a — a NotebookLM audio overview (~14 min). Play this first — it’s the fastest way to absorb what MetaHarness is. ~32 MB
  • 📄 metaharness-report.md — the written deep-dive briefing document the audio is based on.
  • 📝 audio-overview-prompt.md — the exact prompt that generated the audio, if you want to remix it.

Wiring the AI half into Claude Code takes three small steps:

  1. Unzip it next to your project.
    unzip metaharness-dropin.zip
    cd metaharness-dropin/for-ai
    npm install
  2. Point Claude Code at it with a .mcp.json file. This tiny file tells Claude Code about the local knowledge tool. Drop it in your project root:
    {
      "mcpServers": {
        "metaharness-kb": {
          "command": "node",
          "args": ["metaharness-dropin/for-ai/kb-mcp-server.mjs"]
        }
      }
    }
    (.mcp.json is just a list of helper tools Claude Code is allowed to call. Here it registers the knowledge pack as a tool named metaharness-kb.)
  3. Add a verification gate to your CLAUDE.md. CLAUDE.md is the instruction file Claude reads first. This line forces it to check the knowledge pack before answering, rather than guessing:
    ## MetaHarness questions
    Before answering ANY question about MetaHarness, query the
    `metaharness-kb` tool and ground your answer in what it returns.
    If the pack has no answer, say so plainly — do not invent one.

Then confirm it works. Ask Claude Code a question only the pack can answer, for example:

What are the nine composer stages in MetaHarness, in order?

If the wiring is right, the answer comes back grounded in the knowledge pack — Identity, Hosts, Primitives, Agents, Skills, Plugins, Features, Branding, Confirm — with the source it drew from. If you instead get a vague reply with no source, the gate isn’t firing: re-check the .mcp.json path and the CLAUDE.md line above.

Download the drop-in
metaharness-dropin.zip — 27 MB (incl. 🎧 audio overview) — Gate A: 99.9 / 100 — ready now

Ready

NotebookLM studio · the same explainer, every format

Prefer to listen, watch, or skim? Take the studio tour.

We loaded everything about MetaHarness into a public Google NotebookLM notebook and let it produce the same plain-language story in a handful of formats — an audio overview, a short explainer video, a slide deck, a one-glance infographic, and a written deep-dive. Same idea Maya learned (an AI that guesses about your project vs. an assistant that actually knows it, built in about a minute), in whatever form suits you.

Open the NotebookLM studio — audio, video, slides & more

🎧 Audio overview

Listen (~14 min)

Two hosts walk through Maya’s before→after in a friendly back-and-forth. The fastest way to absorb what MetaHarness is.

🎥 Explainer video

Watch the short

A narrated explainer that draws the problem, the fix, and the one command to start — built straight from the notebook.

📊 Slide deck

Skim the deck

A detailed deck you can page through — the whole MetaHarness story, one slide at a time, ready to present or share.

📈 Infographic

See it at a glance

One landscape image: the AI knowledge gap, Maya’s story, and the 60-second fix — the whole idea in a single look.

MetaHarness infographic: 'Give your AI the home-field advantage.' Shows the AI knowledge gap (a generic assistant guesses and makes errors, while MetaHarness builds a project-aware specialist with zero-trust, read-only analysis), Maya's story from the clean-up tax to a 60-second fix to one shared 'npx maya-shop' command for her whole team, and a 'Ready to start? npx metaharness' call to action.

📄 Deep-dive report

Read the briefing

The written briefing document the audio is based on — themes, architecture, host support, and the honest beta caveats.

Built with Google NotebookLM from the same source material as this site · the notebook is public — open it to chat with the sources directly.